Sunday, November 21, 2021

MFT Mini Slimline Box card Challenge

These box cards are so much fun to make. For today's card I used this fun camping set from 2016 called Warm and Fuzzy Friends with the level up mini slimline size card base, new from My Favorite Things.

I have to admit, I did not know what animal was roasting the marshmallow until I got to looking around for when this set was first released. I *guess* it's a fox?! If I had realized, he would be a little more on the orange size, but maybe he's just wearing his winter coat. LOL He's cute with his marshmallow stick though. 
I added Wink of Stella to the fire...can you see it? A little on the bear's fish as well, then covered in glossy accents for fun. Also, nice rainbow trout, Mr. Bear. 
I just realized I probably should not have built the fire in the grass...oops. Next time I'll find a spot of dirt, for safety reasons. :) Anyway, it's a fun campsite, don't you think. 

As with all the Outside the Box products by My Favorite Things, this card folds flat for mailing. This size fits an A7 envelope (used to be called a "check" envelope when we paid our bills with checks. Does anyone still do that?)
Lots of copic colors used for this card, five colors just for the flames! 

Product List:
My Favorite Things, Outside The Box, Mini Slimline Level Up die set
My Favorite Things, Smooth White cardstock
My Favorite Things, Warm and Fuzzy Friends stamps and dies *retired

Pinkfresh Challenge, All About Wreaths, #5

UPDATE: 
So thrilled to find out this card won $50 crafty money at Pinkfresh!!! Go me! :)

My final entry for the Pinkfresh Challenge, All About Wreaths (we're allowed 5 entries, so this IS the final one. ;) ) This is one I hadn't planned, actually, but decided at the last minute to use the poinsetta pieces I had colored a while ago and it all just came together. As you can see, I made a shaker out of this one. It's for a very special friend. I hope she likes it. 


Gold heat embossing isn't perfect, but still pretty I think. Probably why I hadn't planned on using it when I first did it. 

I don't have a full product list for this one, as it was, like I said before, not a planned card. Bits and pieces from things I had cut all pulled together to create this sort of last minute. I will link the few items I can, though as far as copic colors, my apologies that there is no color list for you. 

Pinkfresh Studio, Poinsetta stamp set
Pinkfresh Studio, Poinsetta washi die
Pinkfresh Studio, Mini Slimline Stitched Scallop rectangle die *coming soon
Copic xpress it blending card, copic sketch markers
Gold embossing powder, gold cardstock, gold sequins, acetate for shaker window, glossy accents adhesive, oval die, circle die

Wednesday, November 17, 2021

Pinkfresh Challenge, All About Wreaths, Card 4

I know, I know, this is card number four for the same Pinkfresh Challenge!!! Please indulge me. It's sort of a personal challenge as well, to see if I can make a wreath with any stamp set. It seems to working pretty well, so far, I think. What do you think? 

For this card I used the Pinkfresh Studio Blooming Branch stamps with the coordinating die and stencil sets. I like the finished result. I hope you do as well. 


Once I colored my image, I die cut it as well as two more shapes from solid white cardstock. These are for stacking which I always do with my die cuts. It gives them more stability, plus, if you are coloring the with copics or other markers, it covers the back where the color bleeds through. This is my preference, though totally unnecessary if you don't want to do that.
Then I cut off parts of the large piece and arranged them in a circular shape. If you follow the shape of the stems, it's not as difficult as it might first appear. In fact, it looks almost like it was a circle already if you look closely. I think you can probably do this with just about any floral stamp. I also cut a strip of black and white cardstock for a border piece rather than stenciling a background this time. 

Now that I have my pieces laid out the way I want them, I'm ready to adhere them. Some I'll pop up with foam tape, some will lie flat. I also added a sentiment, which is included in this particular stamp set, and popped it with foam tape as well. Using glossy accents dimensional adhesive, I added yellow pebbles to the flower centers. 
I hope you like my wreath cards. They've been super fun to create, and so easy with the gorgeous products from Pinkfresh Studio. Check them out any time by clicking the link in my sidebar.

Product List:
Pinkfresh Studio, Blooming Branch stamps
Pinkfresh Studio, Blooming Branch die
Pinkfresh Studio, Blooming Branch stencil set
Catherine Pooler, Little Black Dress slimline pattern paper set
My Favorite Things, Smooth White cardstock
My Favorite Things, Persimmon (discontinued color), Poppy (discontinued color), Moroccan Spice ink cubes
Distress Ink cubes, Shabby Shutters, Crushed Olive, Fossilized Amber
Glossy accents, Pebbles, foam tape

Tuesday, November 16, 2021

Pinkfresh, All About Wreaths, Card 3

I'm telling you, Pinkfresh Studio makes it so easy. For today's Pinkfresh Challenge card I used the yet to be released washi tape and coordinating die called In The Meadow. Yes, you read that right ... washi tape! This roll is a whopping 4 inches wide. The beautiful panels are 9 inches. Keep you eyes on the store, as this will be released in the next couple of months. I was lucky enough to get the sneak peek as it was included in our Create and Connect 2021 event this month. 

All the flower images for my wreath are die cuts from the washi tape. If you haven't tried the Pinkfresh gigantic washi tapes yet, you must check them out. They are so pretty and easy to work with. And FUN! I also used one side of the mini slimline stitched scallop rectangle die inked in the same color I used for the background stencil. 
I added a little bling to my flowers, and a stacked, die cut stamped sentiment from Waffle Flower. The background is a stencil by Tim Holtz lightly blended with a brush using My Favorite Things Wild Wisteria ink. 
I always start my cards with a visual layout of how I want it to look when it's finished. It makes it so much easier to finish if you have a vision before you start gluing. If you look closely you can see my secret to create perfectly circular wreaths. Shhhh! Don't tell anyone how I do it. ;)

 
Product List:
Pinkfresh Studio, In The Meadow washi tape *not yet released
Pinkfresh Studio, In The Meadow coordinating die *not yet released
Pinkfresh Studio, Mini Slimline Stitched Scallop Rectangle die *not yet released
Tim Holtz, Dot Fade layering stencil THS006
Waffle Flower, Sentiment Additions stamps and coordinating dies
My Favorite Things, ink cubes Wild Wisteria *discontinued color and Ripe Raspberry
My Favorite Things, Smooth White cardstock
Foam tape, blending brush, bling

Sunday, November 14, 2021

All about wreaths, card 2

Today's card for the Pinkfresh Challenge, All About Wreaths. This one is a non-wreath wreath, so it took a little innovating, which I love. Hope you like it! 

For the background I used the Tim Holtz Burlap layering stencil. I love using stencils for a light background when I don't want a lot of blank space, or if the look of the card requires it. The adorable scallop border is another product not yet released that we used in the Pinkfresh Create and Connect event. It's actually a mini slimline frame. I cut it once from white and once from dark blue then used just one side of the frame to fit my A2 card. I layered it three times for a striking border against the stenciled background.
The wreath pieces are from the Celebrate With Style stamp set. There is no wreath in the set so I got creative and laid them out in a circle to see how wreath-y I could make them. I really like the result. In addition to the flower clusters, I used a few leafy bunches from the Eucalyptus Fantasy stamp set, also by Pinkfresh Studios. I felt like it needed a bow, and with no stamp or die to fit what I wanted, I used twine and a button. Seems to work. 
Who doesn't love buttons? Clearly, I do. This is just one of 3 (or is it 4???) jars of buttons in my craft room, separated by size. These are the tiniest. The copic colors I used on the flowers are listed below. 

Product List:
Pinkfresh Studios, Celebrate With Style stamps and dies *not yet released
Pinkfresh Studios, Eucalyptus Fantasy stamps and dies
Pinkfresh Studios, Mini Slimline Scallop Rectangle frame die *not yet released
Tim Holtz, Burlap layering stencil THS007
Open Studio, Berry Wreath stamps (sentiment)
My Favorite Things, Smooth White cardstock
My Favorite Things, Blueberry ink cube (background) *discontinued color
Copic, Xpress it blending card
Copic, Sketch markers, R21, R29, YG03, Y17, YG97,G99
Twine, button, blending brush, stitched rectangle strip die (for sentiment)

Saturday, November 13, 2021

Pinkfresh Challenge, All About Wreaths

Pinkfresh Challenge, All About Wreaths. A challenge after my own heart! I LOVE wreaths. Also, it just happens that my latest acquisition from Pinkfresh, which I got before the challenge was posted, is the beautiful Eucalyptus Fantasy wreath stamp and die set! It's so pretty I had to have it and then, voila! a use for it immediately. That impulse purchase was meant to be, wouldn't you agree!! 

Here's my card for this challenge. Also from Pinkfresh Studios, the background Slimline Skinny Plaid stencil set. Easiest plaid stencil I've ever tried. Love it! I used the same shades of muted green and browns as I did for the wreath and embellishments...to die for. I really like how this turned out. 

The sentiment is included in the stamp set along with several others. There are no dies for these, but it's plenty large enough to fussy cut if you so desire, as I did here. 
Please notice the dimension here. As you know, I live my life for foam tape. Yet, there is not a single piece on this card! Stacking and layering, baby. Lots of stacking and layering. No foam tape? No problem, with stacks and layers. 

I was inspired somewhat by my own wreath. Searched high and low in all my stamps for a bow but there isn't a single bow stamp even close to it in my whole craft room so I skipped it this time. I'll be on the lookout though for future wreath projects. A bow is sort of essential, don't you think so?
Product List:
Pinkfresh Studios, Eucalyptus Fantasy stamp set
Pinkfresh Studios, Eucalyptus Fantasy dies
My Favorite Things, Smooth White cardstock
My Favorite Things, Kraft dye ink cube
Distress Ink cubes, Bundled Sage, Brushed Corduroy, Walnut Stain (pine cones)
Ellen Hutson, Holiday Sprigs stamps and dies (berries, pine cones)
Copic, Xpress it blending card
Copic, Sketch Markers (not pictured) YG61, YG63, YG91, YG93, E37, R05, R08

Friday, November 12, 2021

Sending Smiles & Hugs

More from the newest love in the studio, from Pinkfresh. I couldn't not have the Garden Roses stamp, die and stencil set in my stash. Roses. Who doesn't love roses? Classic. I am supposed to be packing up my craft bag to take to San Diego for the winter, but I got sidetracked and had to make a card with this set. I've fallen in love with layering stencils and inking thanks to the awesome online event I attended last weekend. Huge shout-out to my bestie, Nikki Foraker, for making sure I didn't miss out after I had accidentally deleted the email! Oh. Yeah. My card.....

Ink colors listed in below this post. So. in. love. 
And, as every other crafter who knows me knows, dimension is life. Foam tape has my heart! I used the basket weave stencil by My Favorite Things for the background in Distress Ink, Scattered Straw. Sentiments are included in the stamp set. 
Pinkfresh Garden Roses stamp set, die and stencil set (sold individually). 
Product List:
Pinkfresh Studios, Garden Roses stamp set
Pinkfresh Studios, Garden Roses die
Pinkfresh Studios, Garden Roses stencil set
My Favorite Things, Basket weave stencil
My Favorite Things, Gravel Gray ink cube
My Favorite Things, Persimmon ink cube *discontinued color
Tim Holtz distress inks, scattered straw, crushed olive
Tim Holtz, distress oxide inks, spun sugar, abandoned coral, twisted citron
Blending brushes, foam tape, tiny pink pearls

Thursday, November 11, 2021

Pinkfresh Studio Create & Connect 2021, Day 2

If you missed my introduction post and would like to see what this is all about, you can find it here

Today's post will be cards from day 2 of the event. Again, using products not yet available for purchase as these were all included in our event kits. Watch for these to be released during the next couple of Pinkfresh Studio product releases.

Day 2
Class 1,  Card 1 
Pinkfresh Celebrate in Style stamp, stencils and dies, mini slimline stitched scallop rectangle die, (I opted not to use the Lush Vines hot foil plate for my version), sparking champagne pearls. 

MFT = My Favorite Things
TH = Tim Holtz distress

From my stash: MFT princess pink, TH spun sugar, MFT fire coral, TH picked raspberry, MFT summer splash, MFT limelight, white cardstock, foam tape, liquid platinum embossing powder. 


Class 1,  Card 2
Pinkfresh Celebrate in Style stamp, stencils and die, blanket stitched mini slimline rectangle die, mini slimline stitched scallop rectangle die, sparking champagne pearls. 

MFT = My Favorite Things
TH = Tim Holtz distress

From my stash: MFT princess pink, TH spun sugar, MFT fire coral, TH picked raspberry, MFT limelight, MFT sour apple, TH fossilized amber, white cardstock, foam tape, liquid platinum embossing powder. 
Both completed cards for Class 2.

Class 2,  Card 1
Pinkfresh Built on Dreams stamp, stencils and die, sparking champagne pearls. 

MFT = My Favorite Things
TH = Tim Holtz distress

From my stash: TH spun sugar, MFT daffodil, TH shabby shutters, MFT sour apple, MFT lazy day, white cardstock, foam tape. 
Class 2,  Card 2
Pinkfresh Built on Dreams stamp and die, foiled die cut sentiments pkg. 

MFT = My Favorite Things
TH = Tim Holtz distress

From my stash: TH spun sugar, MFT orange fizz, MFT lemon chiffon, MFT limelight, MFT lazy day, MFT berrylicious, white cardstock, foam tape, acetate, clear sequins. 

For card 2 we made a super simple shaker. I love making shaker cards and this was the quickest I think I've ever done. If you haven't made one, this is the perfect design to try for a first one. For the base we merely taped/masked off stripes and ink blended a rainbow of beautiful colors. Lovely result!
Wonderfully simple cards to end our super fun event. It was such an amazing experience and I honestly can't wait for the next one. 

There you have it! I hope you enjoyed my creations from this absolutely fantastic crafting event. If you haven't attended something like this, I think it is a huge learning experience for any crafter of any level. Super amazing company and super amazing teachers. 

Go forth and be crafty, creative friends! 

Wednesday, November 10, 2021

Pinkfresh Studios Create & Connect 2021, Day 1 continued

If you missed my introduction post and would like to see what this is all about, you can find it here

Today will be class 2 from day 1. Again, using products not yet available for purchase as these were all included in our event kits. Watch for these to be released during the next couple of Pinkfresh Studio product releases.

CLASS 2, watercolor
Day 1, Card 1 
Pinkfresh Cosmo Bunch stamp and die, Built on Dreams thank you sentiment stamp and die, watercolor paper, sparking champagne pearls. 

From my stash: watercolors, brushes, gold embossing powder, dark plum cardstock, foam tape.

This one comes with a disclaimer. I'm really awful at watercolor! Hahaha! But an attempt was made and I actually created a card for the class. My apologies to watercolor lovers everywhere. It's just not my medium and never will be. What else can I say. My card:
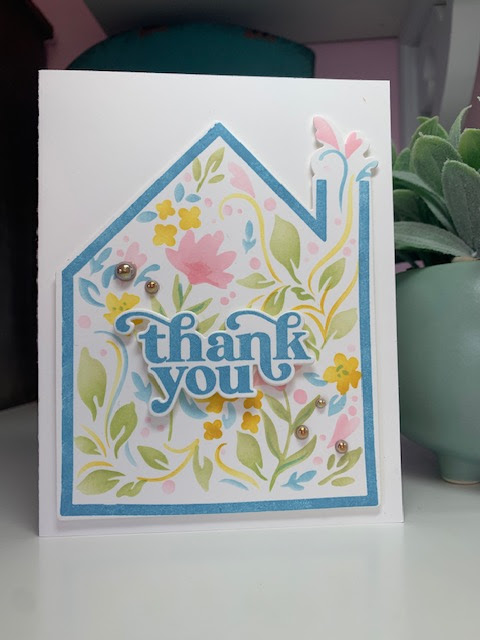
Class 2, Card 2
Pinkfresh Cosmo Bunch stamp, stencils, and die, Always Uplifting sentiment stamp set, mini slimline stitched scallop rectangle die, watercolor paper, sparking champagne pearls. 

From my stash: watercolors, brushes, liquid platinum embossing powder, dark plum cardstock, foam tape.

Heat embossed sentiment from the Always Uplifting stamp set.

I made a second card using the stencils rather than water color. I had to. Sort of as an apology I guess. Hahaha! Anyway, I don't remember all the ink colors I used for it but tried to find similar colors to the paint colors from the first card. I also used the mini slimline stitched scallop die and dark green cardstock for the border, and the sentiment is by Ellen Hutson popped up with foam tape. 

Cards 2 and 3 for Class 2.

Class 3, Card 1
Pinkfresh In the Meadow washi tape, stamps and die, Always Uplifting stamp set, mini slimline stitched scallop rectangle die, sparking champagne pearls. 

From my stash: White cardstock, tuxedo black ink, foam tape.
This washi tape from Pinkfresh is amazing. If you haven't experienced it yet, you really must. It comes in a roll 4 inches wide and the coordinating die cuts an entire panel at once. All of these pieces used here on this card were cut in one pass. Game changer!

Class 3, Card 2
Pinkfresh In the Meadow washi tape, stamps and die, Always Uplifting stamp set, blanket stitch slimline rectangles die set, lush vines hot foil plate, sparking champagne pearls. 

From my stash: White cardstock, tuxedo black ink, foam tape.
From the same one large pattern washi panel, we also made this card. Again, one pass with the die and you have enough gorgeous images for two cards! Sentiment from the Always Uplifting stamp set. See how the sentiment is cut from a separate piece of cardstock? I'm not kidding, I put that portion of the stamp on my misti UPSIDE DOWN and didn't notice till I stamped. Have  you ever done that?! This was a first time for me. Good thing it's a quick and easy fix. What a dork! Hahaha.

Class 3, Make n take
Pinkfresh In the Meadow stamps, stencils, and die, foiled sentiments die cut pkg., blanket stitch slimline rectangles die set, sparking champagne pearls. 

I don't have Pinkfresh inks, so I used the closest matches in my own stash.
MFT = My Favorite Things
TH = Tim Holtz Distress
HA = Hero Arts

From my stash: MFT lemon chiffon, HA butter bar, TH fossilized amber, MFT persimmon, TH shabby shutters, MFT sour apple, MFT factory green, TH hickory smoke, white cardstock, foam tape

In the Meadow stamp is the same design as the washi tape. In this version, we used the stamp and stencils with inks to show what a different look can be achieved using other colors. 


Day one in the books. This was amazing. I will surely be revisiting the class videos and using these designs again in my crafting. Hope you enjoyed my projects from day one, Pinkfresh Studios Create and Connect 2021. We have two classes left for day two coming soon! 

If you have any questions, please don't hesitate to shoot me an email. You can use the link in the sidebar if you don't have it elsewhere (Facebook, Scrapendipity Crafters group, Instagram, etc.) but please remember, if you do use that link, remember to include your email address in your message so that I can reply.