Thursday, May 31, 2012

Favorite Stamps of the Month!

It's time once again for Favorite Stamps of the Month where this month Emma has THREE favorite sets on sale....You're My Best Buddy, Have Fun in the Sun, and the set I'm featuring today, My Little Firecracker. We would love for you to join us for a Link Up Party on the MCT blog using any of these sets! You'll have two weeks to participate, and these sets will be featured on sale through June 30. Hope you will play with us!! Now, let's get on with today's project.

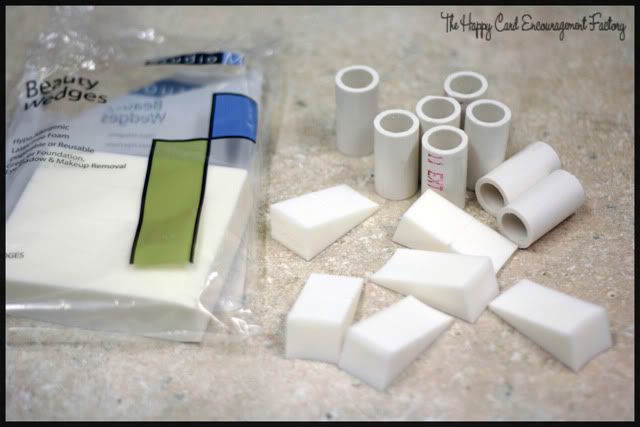
Using the My Little Firecracker set, I decided to make .... firecrackers! One of my favorite things to repurpose is toilet paper/paper towel rolls. These toilet paper rolls are going to be firecracker party favors. And I'll show you how I did it. First, gather your supplies. I'm using red, white and blue papers and embellishments that have been in my stash for years.


Step 1:
Cover each toilet paper roll with paper, leaving space overlapping at each end. I find the thinner paper works best for this rather than card weight. For each one, you'll need a piece of paper approximately 4x6. I prefer to use xyron adhesive for this step, but you don't have to. As long as you use a good glue on the seem you'll be fine.

Step 2:
Cut 4 slits in the paper equally spaced at each end of the roll up to the roll itself, add adhesive if necessary, then tuck them inside.

Step 3:
Cut four (4) 3/4 inch slits, equally spaced, on one end of the tube. Fold them crossing over one another as though you are closing a box using the flaps. Add hot glue to keep the tabs closed snuggly. This is the bottom so you want to make it as flat as you can. {I goofed up on the cuts on my first one, so I have an extra one that's a little shorter than the rest. LOL}


Step 4:
Cut four (4) 2 inch circles for the tops. *Note: I cut two for each top using heavier paper for the back. If I make these again I'll just cut two of the same paper and adhere them back to back so the underside is the same as the top. You can see in Step 5 below why I would do this differently.
Step 5:
Cut 1/4 inch slits all around the circles and fold them up as shown below.

Step 6:
Punch or pierce a hole in the center of each circle for the 'fuse'. To make the fuse (sorry I forgot to get pics of this step.) Roll a length of twine in liquid glue or fabric stiffener. When almost dry, fold the twine onto itself twice and roll it together. The damp glue should hold it at this point. Once it's good and dry, cut it into pieces about 1 1/2 inches long and poke on end through the hole in the circle. Add a good sized glob of hot glue to hold it as this will also be used to open the favor.

Step 7:
Place them in the tops of the tubes to be sure they fit. They won't fit tightly but that's ok. As long as they are not too small and just fall down inside you'll be fine.

Step 8:
Now comes the fun part!! Decorate them all up!!! I used ribbons, twine, even a rosette, and added cute tags cut from My Creative Time dies, and sentiments from My Little Firecracker stamp set. When I finished decorating, I added orange stickles to the 'fuses' to make them look like they are on fire!I love how these turned out and can't wait to fill them with red/white/blue candies!

Product List:
My Creative Time, My Little Firecracker
My Creative Time, stitched scallop die
My Creative Time, stitched heart die
My Creative Time, build a banner star burst die
Papers by Doodlebug
Twine, ribbon, stickles, toilet paper rolls, ink

Thanks for visiting today. Remember this stamp set is on sale through June 30, and you have two weeks to  join us for a Link Up Party showing us your work with the Favorite Stamps of the Month! Hope to see you there. :)

Wednesday, May 30, 2012

It's time once again for 3D Wednesday with MCT

Welcome to another 3D Wednesday. I love doing 3D projects, as I'm sure you know by now if you've followed my blog much. I think the hubs will like this tag book I made with old pics of him and the kid -- and fish. He fishes every day that it's not below 40 degrees. All year long. Serious.  For longer than I have known him he has had a love affair with his pole...I mean his fishing pole of course, cheeky monkey! He fishes like I craft - and we both have our own rooms too, which is pretty cool! Anyway, these are only a tiny handful of the whoppers he has caught in his day. These were all taken in 1983, before we left the beautiful Puget Sound area for this dusty desert place with snakes and no trees. {What attitude? Me? Psssh. Yeah, still not lovin' it.} Anyway, nowadays he is a fly fisherman; fresh water, catch and release angler. I don't mind as I've had my fill of salmon for a lifetime, thank you very much! But I digress...let's get back to my project for My Creative Time's 3D Wednesday!

I used the large tag die to make my "book" and My Mind's Eye, Away We Go 6x6 paper pad. I love the very guyish pattern papers.

Here's my handsome young hubby in 1983 with son, Christopher, who is now 33 with munchkins of his own, who he also takes fishing. Oh yeah, and fish. ;) I used the stitched oval and stitched circle dies here.
Look at this whopper! The fish, not the hubs, silly! Starburst die from the Build a Banner kit, and the stitched heart from 100% Sweetness.
This was a good day....two handed fishing. Awesome. I used the stitched oval die and the starburst from the build a banner kit. The cute little fishy stamp is by Peachy Keen.
This is the same whopper fish from pic #3. Christopher had to 'help' dad hold it, as it was so ginormous. Stitched scallop and teeny tag dies on this page.

Product List:
My Creative Time Dies:
Tag Die
Stitched Scallop and Stitched Circle
Stitched Oval
Stitched Heart
Build a Banner kit
Teeny Tags

My Creative Time Stamps:
My Little Firecracker (star)
Honey Do List (honey)
Here's Lookin' at You (you're my super star; you're simply the best)
Camera Shy (smile for the camera)
Cherish This Moment (pointing fingers; the good life)
My Favorite Sayings (you are a keeper)
Have Fun in the Sun (memories)

Peachy Keen Igloo Die and coordinating stamps (fish)
My Mind's Eye, Away We Go 6x6 paper pad
Jute, K&Co fish stickers, ink

Tuesday, May 29, 2012

Hello...

Hello again! Welcome to another Scrapbuggy Tuesday. Today I used an oldie moldie Quickutz die from way back. This rotary telephone is so cute to convey a 'keep in touch' message or 'just because' card. 


I used wire to make the phone cord. Oh! And telephones are cut from paint chip samples. Those things are fab - paint chips, that is!

Product List:
Quickutz 0663
Martha Stewart scallop dot border punch
My Mind's Eye, Ohh La La pattern paper
Ink and stamp, paint chip samples, wire, ribbon, twine

Saturday, May 26, 2012

Made my own ink daubers

UPDATE: 
Please note, the black ones with caps are pictured for comparison only. I did not make caps for my homemade ones. Sorry for the confusion. 

Pinterest, how I love thee! This idea is so simple, I literally smacked my forehead when I read it. I've had the stuff to make these forever and it just never clicked with me till I saw it done. Duh! 

I had bought this set of 3 mini daubers with the idea that I would get more of them if I couldn't figure out how to make my own after seeing them in person. Before I even had a chance to think about it, I find this pinterest idea. So, one pack of 32 Dollar Store make up sponges already in my stash....
...and a chunk of PVC pipe from the hub's scrap bin in the shop later and VOILA!!!!!
But I couldn't just leave them like that, oh my heck, no! Had the purtty 'em up and what better to do the job than PINK acrylic enamel paint {by FolkArt}, also from my stash. Psshhttt! Cutest daubers on the block.

Original link


Wednesday, May 23, 2012

Sympathy card


Product List:
My Creative Time, Floral Sentiments
Lifestyle Crafts die shapes
Lifestyle Crafts Wildflower gift set {floral branch}
Pattern paper by Authentique, Gathering 6x6 paper pad
Seam binding, Liz's Paper Loft Boutique
Stickles, bling, ink

Tuesday, May 22, 2012

Scrapbuggy Tuesday

Welcome to another Scrapbuggy Tuesday! Today I'm sharing this tag using the Buggy Designs Build a Cupcake die. Can you see where it is? 


It's the butterfly. Isn't it cute! I added some pearls to dress it up. 

For the "life" tag I used just a portion of a drink label die from Lifestyle Crafts. And the fence....I love how the fence turned out. For this little charm I used the Lifestyle Crafts picket fence border cutting it from white shrink plastic. I think it's so cute with the blooming daisy!

Product List:
Buggy Designs Build a Cupcake
Lifestyle Crafts drink labels, DC0231
Lifestyle Crafts picket fence border, CCBDR039
Lifestyle Crafts nesting circles
My Creative Time, Celebrate Good Times stamp and die set
Sizzix Daisy#2 die
Memory Box leaf die
PTI tag die
Twine, shrink plastic, ink, pearls, My Mind's Eye pattern paper

Thanks for coming by the studio. Have a crafty week, bloggy friends. :)

Sunday, May 20, 2012

Masculine birthday card

Happy birthday to my sweet gramps! 


My Creative Time's newest stamp and die sets are perfect for masculine cards. I love the glasses and 'staches! All the stamps for the background are from Here's Lookin' at You; glasses and mustache dies are from the What's Growing On set.


Can you see the lenses in the glasses? I used clear die packaging to make 'real' lenses then stamped under them using the What's Growing On set. The remainder of my sentiment, "....you haven't aged a bit," is computer generated.


Product List:
My Creative Time, What's Growing On
My Creative Time, Here's Looking at You
Pattern papers by My Mind's Eye
Burlap by Liz's Paper Loft Boutique
Ink, clear plastic, cardstock, foam tape, hemp twine

Thanks for coming by the studio today. I'm late getting this card in the mail, but I'm sure Gramps will be thrilled regardless. :)

Saturday, May 19, 2012

Star light, star bright....

...so many stars to make my card. So it doesn't rhyme very well, but the card turned out pretty cool! LOL I enjoyed making this different style. 

With this design, you have to decorate both the front and back as it folds accordian style, that is, in upon itself, so you see the back portion at the same time as you see the front when it is closed.
Here it is opened all the way.

Sentiment on the front using the Lifestyle Crafts banner die set.....
...and the remainder of the sentiment inside, on another of the banners. The 'sun' is the blast from the QK pirates release; the 'moon' is actually a circle which I then cut again to make the crescent shape; and the star is from the QK nesting stars.

Product List:
Quickutz nesting stars
Quickutz cannon blast
Quickutz circle die
Lifestyle Crafts banner dies
My Creative Time Encouraging Quote stamps set
pattern papers by My Mind's Eye

Friday, May 18, 2012

MCT May Release & Birthday Party Hop!


***GIVEAWAY ALERT***
In honor of Emma's birthday month, she will be giving away surprise goodie bags!  All you have to do is follow this blog if you don't already, and leave a comment to be in the drawing. The more blogs you comment on, the more chances you have to win. Remember also to leave a way for us to contact you in case you are a lucky winner! 12 lucky winners will be randomly chosen from ALL COMBINED BLOG COMMENTS so you have 22 chances to win! Sale ends midnight tonight but the deadline for commenting is midnight pacific time, Sunday, May 20! 
GOOD LUCK!
  Welcome to the May Release Emma's Birthday Month Party Hop!!! Today's project includes the new Tag Dies, Fun Pockets, along with a couple of previous releases you may recognize. I made this tooth fairy pocket card. 

But I didn't stop at just the card. I wanted to make a little something for the tooth too. I came up with this shaker box top watch tin using the tooth stamp on shrink plastic to make filler for the shaker. So cute!! 


And a drawstring organza favor bag to hold the tooth......
...which tucks neatly inside the little watch tin shaker! :) 

To fit the folded bill inside, I cut two pockets, attaching one atop the other using foam tape just along the sides and bottom edges. I used two thicknesses of tape to make sure the pocket would be wide enough to easily accommodate the folded bill. 

I hope you can see it in the photo. I used the tiny wings from the Happy Mail set and clear embossed them before adding the tooth on foam tape to the outside of the pocket.


Inside message for the tooth fairy

Thanks for hopping with us today! If you're just starting here, you will want to hop over to Emma's blog to start at the beginning. With 22 chances to win, I'm sure you'll want to visit each and every blog! You will be so pleased with this release I wouldn't want you to miss out on any of it!                                                                                                                           

** HOP LINE UP **
Veronica ~ http://www.vkcreate.blogspot.com
Meet our special guest hopper ~ Carrie ~ http://thegreenbeanscrafterole.blogspot.com/


Product List:
Card:
My Creative Time, Tag dies
My Creative Time, Fun Pockets dies
My Creative Time, Build a Banner dies
My Creative Time, Happy Mail stamp set
Quickutz Nesting Star dies
Lifestyle Crafts Edgers die
Twine from Liz' Paper Loft
Brad, ink, foam tape, cardstock,  MME Lime Twist, Fly a Kite 6x6 paper pad


shaker tin:
Watch tin, drawstring favor bag, star die, foam tape, papers to match card, shrink plastic to make filler, seed beads also for filler