It's clear the September Stamp Society stamp set from Heidi Swapp is a favorite, as you can see by my previous few posts, but I'm still not finished either. LOL Sure, I say it with every new stamp set, but I really do love this set. It is so very versatile with all the fun little elements and can be used in so many, many ways. This project is an adorable little tag book courtesy of Lindsay Bateman's newest FREE class, Society Sessions. Go check it out for a great example of what you can expect from other classes at Lindsay's Heart Space website.
Monday, September 30, 2024
Society Sessions, with Lindsay
Sunday, September 29, 2024
Fall is here, officially
Although the weather here can't seem to decide if it wants to keep on 'fall'ing or stick with the heat. I love the change of seasons, but the actual chang-ing is always difficult for me. Nevertheless, I will still play in my craft room and enjoy every minute of it. Here's the latest.
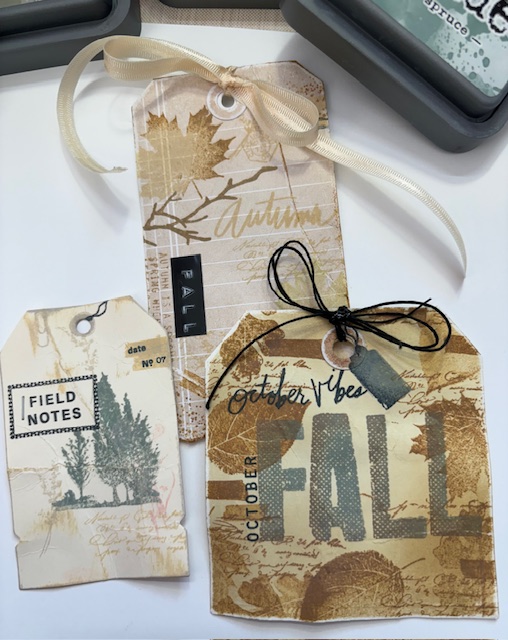
More from the September Stamp Society set from Heidi Swapp. The ideas for this set are endless, I'm telling you. Love! The distress oxide ink colors I used on these three are iced spruce, frayed burlap, vintage photo, antique linen, and shabby shutters.
I did use a couple of stamps from the October Captions, and the alpha is the August Stamp Society, but everything else is new.Can you even? I stuck a tiny staple in this one just because, and grunged it up just a little by crinkling the paper after I stamped it all.
This one is my favorite, I think. I did some crinkling before I stamped anything, and also tore the bottom edge off. I like how it looks. Also added a couple of stamps from the October Captions, and a label maker tape as well.
Saturday, September 28, 2024
Heidi Swapp, October release
This new release is not just stamps, but also dies. Each stamp set has a coordinating die set available as well.
And the mailbox is interactive. How cute to include a tiny post card or letter! But you can tuck in anything that fits. Take a peek. Isn't it adorable.
For the 'handwriting' on the mail, I used the September Stamp Society set which includes these awesome script stamps that can be used anywhere you want them. They make great texture and add interest, but here I've used them even more functional to appear as mail pieces. Fun!I added coffee rings and coffee beans from other stamps I had in my stash to give it a little extra. I also used the September Stamp Society set on this one to add those finishing touches - the string and reinforcement at the top, the 'tape', frame around the coffee definition, and the weeds.
For the lid of the cup, foam tape lifts it for enough dimension to make it seem like you drink it right off the page. But don't do it, it's just paper. LOL
Friday, September 27, 2024
September Stamp Society
If you are a Heidi Swapp lover you are probably also a Stamp Society subscriber. If you are not, you should be. :) This is the September Stamp Society stamp set. There is so much in this set and limitless options how to use them, alone or with who knows how many other stamps you already have. The imagination is going wild. Please enjoy.
The little elements in this set are so fun to use. The tiny reinforcer stamp, the strings, the bitsy tags, and oh my goodness, the adorable paper clip!!
Thursday, September 26, 2024
More Halloween fun
Can you stand this adorable dancing skeleton from the Heidi Swapp Halloween release!?? I had to make him just because. I'm not sure where he will wind up, but he's too adorable not to use on a project. Also, a few tags because I love making Halloween crafts. :)
Wednesday, September 25, 2024
Haunted mansion, creepified
Loving the new haunted house die from Heidi Swapp's Halloween 24 release. This die also has coordinating stamps that work perfectly with the house (separate purchase) so you can really jazz it up. I love being able to add the extra touches, but you can do that with pens as well.
I used Distress Oxide Lost Shadow ink over the black cardstock and add some accents in white gel pen for this sort of creepy look. There are so many ways to use the house and fix it up, or mess it up however you want it to look. LOL Don't you love the creepy guy in the doorway? He's part of the coordinating stamp set you can purchase to go with the die.
Tuesday, September 24, 2024
I call this one Plot Twist....
And you could be right.
But no. Here's the twist.....it's only the witch luring Hansel and Gretel to the candy house in the nearby cemetery! TURN BACK!
The witch has decked out the cottage in balloons, cherries, candy corn, suckers, frosting, and all manner of sweets beloved by children at Halloween, just for starters!
Who knows what awaits the children inside!!!?
This was such a fun way to use the new haunted house die in this release. I'm having a blast with it!! My brain is going a mile a minute and my hands can't craft fast enough. LOL Go check out the new products in Heidi's shop. Be sure to check out the classes while you're there too.


