Friday, September 28, 2012

It's a Beary Special Blog Hop!

Welcome to a Beary Special Blog Hop featuring this very special release!! Even though it's not quite Halloween, Emma has decided to give YOU a Beary Special Treat! And best of all, it doesn't cause weight gain.....but be careful because it WILL cause CUTENESS OVERLOAD! We're having a special hop today including a Beary Special stamp set designed by Emma. AND, joining us for this Beary Special Hop are five VERY TALENTED Guest Designers! You won't want to miss any of it!


**A BEARY SPECIAL GIVEAWAY**
Emma has a few GREAT giveaways to give to THREE LUCKY peeps!
1st prize 
Teddy Bear Parade cartridge AND Beary Special Thoughts stamp set
2nd prize
 Create a Critter 2 cartridge AND Beary Special Thoughts stamp set
3rd prize
Beary Special Thoughts stamp set


How FUN is this! All you have to do to enter is leave your comments on each designer's blog. The more blogs you comment on, the BETTER your chances of winning. Deadline is midnight, Sunday, Sep 30. PLEASE remember to include a way for us to contact you just in case you are one of the lucky winners! 
Winners will be chosen Tuesday by random.org. Good luck!  

But that's not all! In addition, I will be doing a giveaway as well. Chosen randomly from comments on this post only, one lucky follower-commenter will win this adorable Ballerina accessory die* made for the exclusive Button Bear die. As far as I know, this is the very last one {I didn't see any on ebay} of the Scrapbuggy button bear exclusives and has been donated by Gia herself for this giveaway. Not a follower of my blog yet? Sign up and leave a comment so you will be entered in BOTH drawings! I'll announce the winner on Tuesday, so be sure to check back.

*ballerina accessories only. actual bear die NOT included.


Here's a sample card using the ballerina die with the Button Bear die. Isn't it just the sweetest!?? I've used this adorable little sentiment from My Creative Time, All Star Baby. 

Ok, let me start the hop by saying I had so much fun with this set I couldn't stop playing!! I still have one project to finish which I had hoped to have done in time for the hop, but will have to be posted later this weekend. I ran out of time!  LOL This first one is a birthday card for the youngest grandboy, Logan (thus the name, Logan, on the present LOL). I put the bear on a wobble, but because it's such a big image with the present, I needed two wobbles. It works great!  


This fancy fold card is held closed by the acorn which tucks under the large maple leaf. I love doing these fun designs. They create such eye appeal and add interest to an otherwise plain, flat card. 

I love the combination of all leaves with the acorn. And the papers. These are "Tree Love" by Nikki Sivils. This paper on the right is a simple woodgrain pattern that I jazzed up with MCT fall background stamp from the Just For You set. Maple leaves are also MCT.


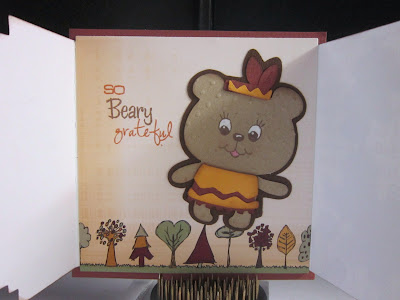
For my inside message, I used the Create a Critter2 cartridge. Love this sweet little Thanksgiving Indian Bear. I combined the MCT So Grateful set with the Beary Special Thoughts set. And, of course, he has a cute little Peachy face which makes him even more unBEARably sweet!


Next up is yet another adorable bear die, this time paired up with MCT clouds, Happy Mail stamp set and Beary Special Thoughts set. He looks so sad. :(


I put the clouds on a wobble. 


The strawberry is an oldie from Quickutz; banner by Paper Trey Ink with a sentiment from the new Beary Special Thoughts release.

So there you go! A few ideas to get you started with this adorable new "surprise" release! If you are coming here first, you will definitely want to start at Emma's blog so you don't miss a project. We have FIVE FABULOUS guest designers joining us today as well, so there's a lot of fun and inspiration awaiting you! Remember also to leave your contact info/email address with your comment in case you win!!

Here's the line up....hop on over to My Creative Time and get started!
Good luck everyone. 


Combined Product List:
MCT Beary Special Thoughts stamp set
MCT Just For You fall background stamp
MCT Happy Mail stamps
MCT Grateful For You stamps
MCT Piles of Smiles, leaf dies
MCT, Just Tags dies
MCT 100% Sweetness heart die
MCT Fly Away With Me cloud dies
Quickutz, Cottage Cutz, Scrapbuggy, Spellbinders, Paper Trey Ink dies
Basic Grey, Nikki Sivils, Chatterbox, Pink Paislee pattern papers
Buttons, ribbon, twine, ink, wobbles, foam tape

Wednesday, September 26, 2012

3D Wednesday - Photo display

Hey guess what.....today is Hump Day!! But it's also 3D Wednesday with the My Creative Time Design Team! I think this might be my favorite new feature. I love making 3D projects. Today I'm sharing these adorable individual photo displays. These are perfect for a desktop or anyplace you want to share special photos that you may not to have space for, or want to share, a full album.


To make these displays, I started with a small block of wood, stolen from my husband's workshop. He'll never miss it. I snagged it while he was gone and cut the pieces myself on his chop saw. Shhh! Don't tell. He insists I'll chop my hand off if he's not there when I use the power tools. Pfftt! Scaredy cat. 

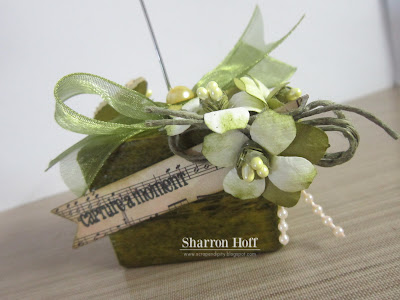
After I sanded and distressed the wood chunks the way I wanted them, I stained them with distress inks. I love the way the wood takes the colors. I didn't do anything special either; just inked the wood the same way I would paper, using my ink applicators. This one is peeled paint. Love this shade of green. Then I painted with two coats of  matte finish Mod Podge.

Once it was completely dry, I drilled a teeeeeeny hole {no bigger then the wire I would be inserting} into the top of the wood block and glued the wire card holder into the hole with Glossy Accents.

Now you're ready to decorate. Do whatever you like. It's like a teeny little blank canvas waiting for your artistic fingers to add life! I added these pretty dogwood blooms I made using the Martha Stewart hydrangea punches, some twine, ribbon, pearls and a butterfly {barely seen at the back on the left}. For my sentiment, I used My Creative Time, Camera Shy stamp set.

For this one, I used the My Creative Time polaroid die to make a small picture frame. You don't have to use a bare naked photo, you could use this idea and put it in a frame first.

I used lots and lots of flowers and pearls on this one. I love that hydrangea punch. It's actually pretty versatile. As you can see, the flowers on each of these photo block are completely different, yet I used the very same punch. Gotta love that. Sort of buried under all the fun goodies is the My Creative Time heart die and teeny tag. The sentiment again is from the Camera Shy stamp set.

I added a tulle blow with a flourish and pearls for extra fun. Isn't this a pretty color on the wood? This one is aged mahogany.

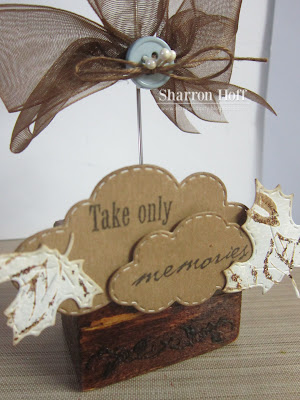
And for the third one, I didn't want to go overboard with the froofy stuff, in case I want to share guy pics. I couldn't imagine a fishing or hunting photo on an all froofed and frilled up photo stand. It just seemed wrong, so I did this one in browns and blues. A little more toward man style than all the flowers and ribbons. LOL

Here I've used the adorable clouds and fall leaves from My Creative Time. I love these for masculine or non-gender specific projects. Who doesn't love nature-y type stuff, right?? For this one I used my all time favorite  distress ink color, walnut stain. I love the sentiment. It's actually only a part of the quote by Chief Seattle, which goes, "Take only memories and leave only footprints." My apologies for not knowing who makes the stamp set. It's one I purchased from someone's stash and there is no packaging or printing anywhere to indicate what company makes it.

It isn't showing up as well as I would like in the photos, but can you see the added little element across the bottom of the wood block? I LOVE how this turned out and in real life it is really really cool! After the Mod Podge was dry I stamped this leafy flourish directly onto the block. Because the surface is then non-impervious, the ink doesn't dry, giving plenty of time to add embossing powder. I was a tad nervous about what the heat might do to the Mod Podge but it didn't seem to bother it at all and the whole look turned out super awesome. It looks almost antique-ish.

Well there you have it. I hope you enjoyed this project. I love it so much I think I might just be making more of them. They are actually a pretty simple little gift if you're looking for Christmas ideas. Thanks for coming by today. Don't forget to check the other designers' projects today as well. They're going to knock your socks off! :)

My Creative Time products used:
Camera Shy stamp set
Heart die
Teeny tag die
Polaroid die
Clouds die
Leaves die
Other:
wood blocks, mod podge, card holder wires
Distress Inks
Glossy Accents
Ribbon, buttons, twine, pearls, tulle
Martha Stewart punch
Quickutz flourish die

Friday, September 21, 2012

My Creative Time Blog Hop and GIVEAWAY --updated with recipe!


Update: Added recipe at the end!

***BLOG HOP GIVEAWAY ALERT***
For our blog hop giveaway, there will be 2 winners chosen from ALL the comments combined!  Up for grabs is a  SURPRISE GIFT BAG FULL OF GOODIES All you have to do is leave comments on all the design team blogs AND remember to leave a way for us to contact you in case you are the lucky winner. 
Winners are chosen randomly. Deadline is midnight Sunday, September 23. 
GOOD LUCK!
***** ***** *****
If you didn't get enough from the sneak peeks this week -- I know it seems we sort of cheated everyone since it was a mini release this time! LOL -- you'll have lots of extras to see today. We have two guest designers joining us for this release and you won't want to miss their fab contributions to the line up! It's been great having Cheryl and Jayne working with us this week. 

For my first project today I've done a super cute little mini book using the Just Tags dies. Oh em gee, I love this layering tag set! So cute to use alone as I've done here, and perfect as a gift enclosure or tie-on. 


The sweet little Rudolph is from the Create a Critter cartridge and the papers are Echo Park, Season's Greetings 6x6 paper pad.


Title page :)

Each Christmas I make the grands reindeer poop or snowman soup. The boys especially like to gross out the girls by 'eating poop' --LOL-- the "story" is this adorable little poem that goes with it.


My next project, again using these fantabulous layering tag dies {aren't they AWESOME!?} is this tombstone Halloween card. It's so versatile! 


Inside is the "real" tombstone, complete with cracks in the concrete, dirt, fall leaves and ghostly figure!!!

I can't tell you how much fun this mini release is! The tag dies are an absolute must-have for any  paper crafter whether you make cards, layouts or anything else. They are just the size and to have them slightly different sizes for layering makes the perfect. Don't miss out, I have a feeling these will go super fast and you won't want to wait!

Ok, let's get to the hop, shall we!?? If you are coming here from Ruthie's blog, you are in the right place. If you are stopping here first, you may want to go to Emma's blog and start at the beginning so you don't miss anything. Remember to comment on every blog for your chance to win one of TWO super bonus gift bags!

Here's the hop line up! 


Product list:
My Creative Time, Just Tags dies
My Creative Time, All Around Goodies
My Creative Time, Warm Holiday Fun
My Creative Time, It's a Magical Season
My Creative Time, Teeny Tag die
My Creative Time, Stitched Circle die 
Create a Critter Cricut cartridge
Echo Park, Seasons Greetings 6x6 paper pad
Bazzill cardstock
Tim Holtz jump rings, TH distress markers, ribbon, bling, ink

Product list:
My Creative Time, Just Tags dies
My Creative Time, Just For You
My Creative Time, Treats for my Sweet
My Creative Time, Piles of Smiles leaf die
My Creative Time, Build a Banner die
My Mind's Eye Mischievous 6x6 paper pad
Paper Trey Ink banner die
Ink, leaf dies, TH distress marker, foam tape


Thanks for coming by and hopping with us today. Be sure to leave your contact info in case you win a goodie bag. I hope you're finding some great ideas to spur on your crafty motivation. Have a wonderful weekend! ♥


EDITED TO ADD:
Reindeer Poop recipe - 


Use mixture of chocolate peanut butter balls or chocolate oatmeal cookies with coconut in them, chocolate covered raisins, chocolate covered peanuts, and add mini marshmallows.

Chocolate Chex Mix would work too!

Wednesday, September 19, 2012

Sneak Peek Mini Release!

Cute cute cute and more cute! Emma's My Creative Time mini release is perfect for bakers and goodie makers! Case in point, I make little treats for the kidlets to put in the Christmas packages every year and try to do something a little different each time, even if the treat itself is mostly the same. This one is Snowman Soup! 

Snowman Soup recipe
1 package hot chocolate mix
3 Hershey Kisses
10 mini-marshmallows
1 candy cane

Attach this poem:
Was told you've been real good this year
Always glad to hear it
With freezing weather drawing near
You'll need to warm the spirit
So here's a little Snowman Soup
Complete with stirring stick
Just add hot water, sip it slow
It's sure to do the trick!


Snowman Soup stamp from the new mini release! Mug is from the All Around Everything image set.

Just Add, and water are from this new release as well.

This adorable tag {that I forgot to get a picture of before I put it in the bag! sorry} is from this new release too. I absolutely LOVE this round topped, edge stitched, layered tag!! Perfect for Christmas gifts; or any gift for that matter.

Just so you can see all the ingredients. Except for the Hershey Kisses, which I forgot. Urgh. :{

And a flower, of course. I couldn't NOT do a flower. :)

This is how I made the bag topper. Using the My Creative Time Gift Card die, I placed chipboard over each of the cutting areas that I did not want cut; the two corner slots at the bottom and the half-circle notch at the top.

Ignore the chipboard and place paper on top as usual and run through the die cutter. Voila! No cuts in the middle of the topper. :) Cut to the size you want and score across the middle. TIP: If the chipboard pieces leave any creases in your paper, simply rub them out with a bone folder and you're good to go!

Thanks for coming by for this sneak today. There will be more sneaks tomorrow from the rest of the team so you'll want to be sure and catch those as well. Also, our hop on Friday will be filled with delectability {I think I just made that up} so don't forget to come back for that too!

Product List
My Creative Time All Around Goodies stamp set
My Creative Time Just Tags die
My Creative Time Gift Card Holder die
My Creative Time Stitched scallop and circle dies
My Creative Time All Around Everything stamp set
Martha Stewart scallop dot border punch
Stampin Up ribbon slots punch
Paper Trey Ink banner die
Simple Stories 25 Days of Christmas 6x6 paper pad
Ink, snowflake confetti, twine, sheer ribbon

Friday, September 14, 2012

Happy birthday to my husband

For my hubby who will always be older than me.
♥ you, Randy! 


Product List:
K&Co. designer paper 6x6 pad
Liz's PaperLoft Boutique, burlap
My Creative Time, Build a Banner kit {tag die}
My Creative Time, Happy Homecoming and Teeny Tags greetings stamp sets
Quickutz pinecone die
Twine, mini brad

Thursday, September 13, 2012

Whooo loves recycling????

I do, that's WHOO!!! Today I'm going to show you how to make a super cute Owl treat container from an empty toilet paper tube and a few die cuts. Isn't he a HOOT!?


First you'll need the tubes and a piece of paper 5x6 inches to cover each one.

I forgot to get a picture of tucking the ends to the inside so I'll borrow this one from the 4th of July firecracker project I did. Same process, do this on both ends of the tube. Make four slits evenly spaced around the top of the tube. Add adhesive and fold paper to the inside.

 You'll use this cutting technique on one end of the owl tube to make a flat bottom on which it will stand. Again four slits evenly spaced, about 1 inch long. Fold them overlapping like you would do to close a cardboard box. You can hot glue this closed if you like, or not. Matter of preference.

On the open end, fold the two sides toward each other until they meet in the middle and press down in the center.


All that is left now is to decorate! You can use sharpies and hand doodle your designs {this would be a great place for the kids to take over!} or use punches or dies, as I did, for making the eyes, feet, beak, wings, etc.

Make a couple thousand of them. Decorate as you wish. Fill with goodies and fly over town throwing them from a helicopter. Ok, ok, I'm kidding about the thousand and the helicopter. But have fun! These would be great favors for a classroom party or Halloween get together!

Product List:
Empty toilet paper rolls
Various pattern papers and adhesive
Dies or punches; I used ovals and circles
Sharpies or crayons
Googly eyes if you wish; I just used a sharpie
My Creative Time All Around Halloween and Treats for my Sweet stamp sets
My Creative Time leaf, tags and banner kit dies