Tuesday, February 28, 2012

Scrapbuggy Tuesday

Welcome to Scrapbuggy Tuesday. For today's super cute project, I used the berry basket die from the Lifestyle Crafts CHA release. This is so versatile and just as cute as can be. I love the basket and thought it would be perfect for a thank you or cheer up gift with malted milk eggs inside.


For the basket handle I used the larger of the weave border dies (set of 2) also from the CHA release.

The tulips and leaves are made from the 2x2 egg die!!! (0933) Super simple but so cute in this spring gift basket.

The sentiment is by My Creative Time, Teeny Tags Greetings.


Product List:
Lifestyle Crafts CHA Berry Basket
Lifestyle Crafts CHA Weave border dies
Quickutz egg die, 0933
My Creative Time, Teeny Tags Greetings
Papers by Lifestyle Crafts, Sweet and Sassy collection
Bazzill textured cardstock {flowers}
Lollipop sticks, marking pen, hot glue, tissue for filler, styrofoam

As you have probably heard, Scrapbuggy has made a huge announcement. The store will be closing in the near future and that makes me, and a lot of other people too, very very sad. We will miss Gia and her Buggy Designs dies that are always so stinkin' cute. Love you Gia!

Monday, February 27, 2012

Border die rosette

Today I'm going to show you that you don't have to have a rosette die or cartridge to make rosettes. It's really pretty simple. Rosettes can be made from almost any border die, edge punch or decorative scissors.


That said, I highly recommend this particular die by Lifestyle Crafts if you enjoy making rosettes. It IS a rosette die, a plain simple rosette, but it is invaluable for making nearly every other rosette I make. You'll see why in a minute. However, you can also use your scoring tool to do the same thing; this just makes it way faster, and IMO, more precise.


I decided to try the new weave borders for my rosette. We'll see how they turn out.


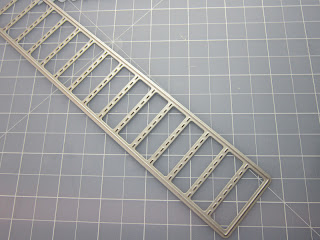
Here is where the plain rosette die comes in. I use it to score my border strips. Awesome! I tape the ends down just to keep it straight. Saves so much time and frustration from trying to score it yourself on a scoring board. One run through the die cutter and you're done.

Fold along the score lines....

...and adhere ends together to form a circle.


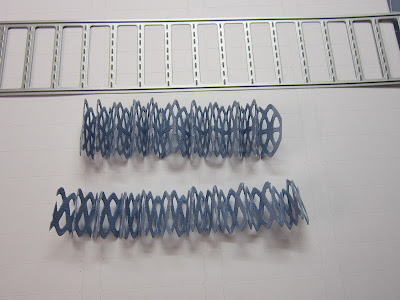
This is where it gets a little tricky, depending on the design you're working with. If there is a lot of open-work in the design, as with these, you might want to experiment with running a thin piece of tape all across the back to help stabilize the folds. (I didn't do that here and you see what happened.) The smaller of these two borders did not work well when it came time to flatten the rosette. (the smaller one pictured below)


So I went with the larger design. There are still a few areas where the score lines torn, but the end result worked out pretty well, I think.


Here is my finished card. I like the blue/brown color combination for masculine cards and these papers are perfect. Basic Grey, Granola collection. Sentiment by My Creative Time, Turn That Frown Upside Down.


Hope you like it and I hope you'll try making your own rosettes using your border punches or edgers. You'll be surprised to see how many ideas you can come up with once you get started! Have fun. :)

Product List:
Lifestyle Crafts, DC0222 rosettes
Lifestyle Crafts weave borders, DC0274 release date April 1
Lifestyle Crafts nesting lace circles, DC0155
My Creative Time, Turn That Frown Upside Down stamp set
Basic Grey, Granola paper collection
Ribbon, string, tag, ink, pearl beads, clear pebble sticker, button

Thursday, February 23, 2012

Stamp of the Month, My Creative Time

Welcome to another edition of Stamp of the Month Thursday! This month we are featuring stamps from the first, second and third editions of My Creative Time Stamps. Be sure to check out the new store for these sets on sale right now!! AND, if that isn't enough, Emma is hosting a linky party as well! Head on over to her blog {click here} and check out the details for sharing your project with the fave stamps of the month!

For my card today I used two sentiments from 'You Had Me at Chocolate', from the First Edition stamp set, in addition to the new layered egg dies from the Hello Spring new release.


This adorable little bunny with the cute flirty face is by Peachy Keen.

I wanted to spruce up the eggs but not too much since I wanted to use them for my sentiment. So I used the daisy background stamp that comes with the Hello Spring set and stamped it with Versamark ink to give it just a little something without overwhelming the greeting.


Be sure to check out the new store if you haven't yet. Through Friday use coupon code GRANDOPENING for 10% of your entire order!! Happy shopping! And don't forget to link up your project for out stamp of the month linky party too!

Product List:
My Creative Time, You Had Me at Chocolate
My Creative Time, Hello Spring
Peachy Keen/Scrapping Cottage collaboration Easter Bunny die/stamp set
Martha Stewart butterfly punch
Lifestyle Crafts loopy edger
Lifestyle Crafts nesting ovals
Bazzill textured cardstock
Imaginisce, Lucy Bird pattern paper
Versamark inkpad, bling, ribbon, ink, white pen

Wednesday, February 22, 2012

Flower pictorial - MCT dies

Hey, it's hump day! Do you know what that means? It means we're over the hump of the week and rolling downhill toward the weekend, that's what that means! Also, it means garbage day at my house, but that's probably not as fun for you as it is for me! Hahaha!!

Someday I will get the hang of videos, but for today's post, here is the story in pictures. Several of you asked how I made the flowers from Emma's dies that I used on this card {below} and I promised I would do a tutorial. I hope this works for you!


These flowers are really easy to make. For this tutorial, I made one with the plain stitched circle die as well as one with the stitched scallop circle, like the one on the card. You can use cardstock or double sided pattern paper depending on the look you want. Please forgive the horrible picture quality - I was doing it one handed and with a new camera...and not very well evidently. LOL But here goes.

Step 1:
Start by cutting out your shape. If you don't have these, you can purchase them right now at My Creative Time for 10% off through Friday, the 24th, using coupon code GRANDOPENING!!


Step 2:
Starting anywhere on the circle or between one of the scallops on the other, cut the shape into a spiral.....

.....until you have a small circle tab at the end. This is the base you'll glue the flower to when you finish rolling.


Step 3:
I've done it backwards in the photo. And I didn't use double sided paper on purpose to show you not to do it this way. Hahaha!!! I fixed it after I took the pic, so the finished flower is the way I wanted it with the pattern showing. Sorry for any confusion!


Begin rolling the flower with the finished side on the INSIDE (not as I have shown here--this would be mostly all white if I hadn't rerolled it the opposite way afterward). It seems backwards, but you'll see what I mean once the flower is rolled and glued.

Here they are before gluing. Notice you see only the white on the scallop flower {right} before I rolled it the opposite way - with the pattern showing on the inside of the petals.


Step 4:
Gluing. It's impossible to see in this poor shot {again my apologies - I'll try to get a better angle next time and not so blurry} but at this point I have manipulated the flower the way I want it to look and added a dab of glue to the  tab at the end of the spiral.

Sort of 'cup' it around the bottom of the flower to hold it in place as the glue dries/cools.


Step 5:
Add leaves, and ink if you like, and your flower is done! You can take the added step of bending the petals outward with a tweezer or leave them as they are.

The circle flower I left alone, the scallop flower I bent the petals outward.


So there you have it. Very simple! If you have any questions let me know and I'll do my best to get back to you promptly. And if you are purchasing the dies today, remember to use your GRANDOPENING coupon code for 10% off your entire order!! Who doesn't love a sale, huh!? Happy shopping....and flower making!

Monday, February 20, 2012

Butterfly birthday card

Don't adjust your tv set....I mean monitor. ;) The colors are very subtle and you can barely see them but they are yellow and green. I used sheet music from the thrift store to cut the butterflies. I love the look of music 
paper. 


Here you can see the large butterfly is actually two different dies, one overlays the other, both by Memory Box. They are a new company to me but I am loving their dies! And cooler yet, they are here in Washington! The small butterflies are a punch by Martha Stewart. I punched each in black and offset for a shadow affect.


Product List:
Memory Box butterfly, Vivenne {intricate overlay}
Memory Box butterfly, Darla {solid shape}
Martha Stewart butterfly punch
Martha Stewart scallop dot border punch
Spellbinders Picot Edge circle die
PaperTrey Ink sentiment stamp, Just the Ticket set
Pattern paper, DCWV, Botanicals
Sheer ribbon, pearl beads, ink

I'm not usually one to tell stories but today I have a funny story about the music paper {actually rather pathetic story, but I'm going to share anyway ;)} When I went to the thrift store in my search for sheet music, I expected it was a good bet I'd find tons of it. Boy was I wrong. I don't know if it's just this teeny town where I live or what, but there wasn't any. None! So I went up front to ask. There were three guys talking with the lady who works there {I used the term 'guys' rather loosely - they were big hulky redneck looking creatures who all appeared sandwiches shy of a picnic. No exaggeration- and you'll see what I mean.}

So I wait for them to stop talking then I ask the lady if she knows where I can find sheet music. The creatures  looked at me as if I had lobsters crawling out of my ears, to quote my favorite Christmas movie. Then they all looked at each other, then back at me. I repeated myself, enunciating better this time. "Sheeeetttt music" I said. "You know, for playing piano or other musical instrument." The lightbulbs apparently went on. The biggest and redneckiest of the hulky creatures laughed loudly and said, "Ohhhhh! I thought you said 'sheep' music! hyuk, hyuk, hyuk!" And the others followed suit belly laughing at his comment. It's anybody's guess why these 'guys' wouldn't know what sheet music is but would assume there is such a thing as 'sheep' music. I left there with no sheet music and praying for any sheep that may be near by. Thankfully, I found this paper at the only other thrift store in town. And they immediately knew exactly what I was asking for. Imagine that! HAHAHA!!! 


Sunday, February 19, 2012

LOLing

Searching for a song for today's post I came across this one called Strawberry Shortcakes. I was waiting. But obviously didn't hear what I was expecting. Made me laugh. So I decided to share it with you too! Enjoy. ;)

Berry Basket

Cuteness! Talk about a fun coincidence....the day I made these strawberry cake mix cookies that I found on Pinterest, my design team dies from the Lifestyle Crafts CHA1 release arrived...with this super sweet little berry basket die!!! 


Here you can see the size of the basket in relation to the cookies. That is a jumbo sized muffin paper the cookies are sitting in.


I found the recipe on pinterest to make these cookies.

I simply could not resist...they are PINK! And very tasty as well. :)

Product List:
Lifestyle Crafts, CHA2 release, Berry Basket
Buggy Designs, Build-a-Cupcake, strawberry
Scrapping Cottage, In the Kitchen stamp set
Ribbon, ink, gift bag, and cookies!
Pinterest link to cookie recipe

Saturday, February 18, 2012

Just a Note...and a "little" happy mail!

I love this adorable eyelet closure envelope from Lifestyle Crafts. It comes with two sizes, each with a matching enclosure card die. So cute!

This is the mini set, and I do mean mini. Finished size measures approximately 1.75 x 2.75 (I say approximately because my skills at reading a ruler are crap once you get beyond quarter inches. LOL!) Isn't it adorbs, though. :) I used the Happy Mail stamp set by My Creative Time for the enclosure card.

As much as I love the cutie patootie mini set, the larger size is my fave. Finished size, the envelope is just shy of 4x5 inches and the enclosure card is just enough smaller to fit perfectly inside. The shape and the size are perfect. And the fact you can cut the card in one swoop through your cutter beats using the trimmer or knife--no measuring. Simply fold your cardstock base and lay it on your cutting pad with the fold just inside the cutting edge on one side. Run it through and voila! No crooked edges and they all line up perfectly. Easy peasy, lemon squeezy!! {uhhhhh, my apologies for the uuuug-lay cutting pad!!)


To make the notched corners on the top mat layer, I punched the corners with a circle punch as you can see here. This punch is 1/2 inch.

A tip: tape a piece of paper over the brad on the inside of the envelope before you assemble and glue it together. This will prevent your card from getting caught on it as you slide it inside.


Here is my finished card and envelope. I used the paper collection, Sweet and Sassy, also by Lifestyle Crafts.

Here you can better see the dimension on the flower and butterfly.


Product List:
Lifestyle Crafts Eyelet Envelope and Card die set
Lifestyle Crafts Sweet and Spicy paper collection
Lifestyle Crafts Wildflower gift set
Martha Stewart butterfly punch
EK Success circle punch
PaperTrey Ink Just the Ticket stamp sentiment
Brads, twine, foam tape, Bazzill textured cardstock

Thank you for stopping by the studio today! Be sure to check out the Scrapbuggy store. She is clearing out inventory and everything is on sale. Once it's gone, it's gone and quantities are limited so don't wait!

Thursday, February 16, 2012

MCT 14th Edition Spring Blog Hop!

Welcome to another fabulous blog hop featuring 
the new spring releases by My Creative Time!!

***HUGE GIVEWAY ALERT***
For our giveway today, we are  giving ONE LUCKY winner a $100 Gift Certificate to "My Creative Time's" new online store!  All you have to do is leave a comment on each designer's blog {remember to leave a way for me to contact you!!!!!} Each designer will choose a finalist who will be entered into the final drawing, giving you 18 chances to win! The more blogs you comment on, the more chances you have to win, so get going! ;) 
Deadline is midnight, Sunday, February 19. 
GOOD LUCK!

For my project today, I've used the Happy Hunting set...

and the new Hello Spring stamp AND layered egg die set!


You couldn't get any more springy than a good old fashioned Easter egg hunt! So I made this sweet little french fry box Easter basket! It's the perfect little candy treat box for little ones who may not be into the huge egg hunt thing, or for a Sunday School class, Easter Brunch table favors, or just a sweet something for someone special.


I didn't have any "appropriate" candy to fill it with so I have pretend eggs in there for now. ;) The paper eggs will be replaced when the Easter candy comes out {if I know what's good for me! haha!!!}


If you started here on my blog, you'll want to hop on over to Emma's blog at My Creative Time to start at the beginning and to see her video showing the full release. You're gonna love it! 

Thanks for hopping with us!  Be sure to leave your contact info in your comment in case you win -- last time I had to put three numbers into the random generator before I found someone who left me their contact info!!! Don't be a one of the unlucky ones. ;) 


Product List:
Check out the NEW MCT store!!! Grand Opening going on NOW!!! :)
My Creative Time, Happy Hunting
My Creative Time, Hello Spring
Quickutz french fry box die
Pattern papers by My Mind's Eye, Vanity Fair 6x6 paper pad
Bazzill textured cardstock
Ribbon, ink, dry embossing {Cuttlebug}, mini brads {ribbon handle}


A p.s. for those who asked about the flowers with the scalloped circle die. I will do my very best to do a tutorial on that. In the meantime, in the coming week, I'll post a pictorial showing each step - you'll be amazed how easy. Really!